Last Updated: May 2026 | Author: Marcus Hale | Reading Time: 12 min
Most laptop cleaning advice either tells you things you already know — “wipe the screen with a cloth” — or skips the parts that actually matter, like how to safely clean the keyboard without getting liquid into the chassis, or how to clean vents without destroying the internal cooling system.
I’ve seen someone ruin a perfectly functional laptop by spraying glass cleaner directly on the screen. I’ve seen keyboards stop working after someone thought a quick wipe with a wet paper towel was sufficient cleaning. These are completely avoidable mistakes — and they’re the reason how to clean your laptop without damaging it is a question worth answering carefully rather than quickly.
This guide covers the complete cleaning process — screen, keyboard, trackpad, chassis, and vents — with the specific materials that are safe, the materials that aren’t, and the techniques that work without creating new problems.
Table of Contents
Before You Start — What You Need and What to Avoid
Knowing how to clean a laptop without damaging it starts with the materials. The right tools make every step safe. The wrong ones are how laptops get damaged during cleaning attempts.
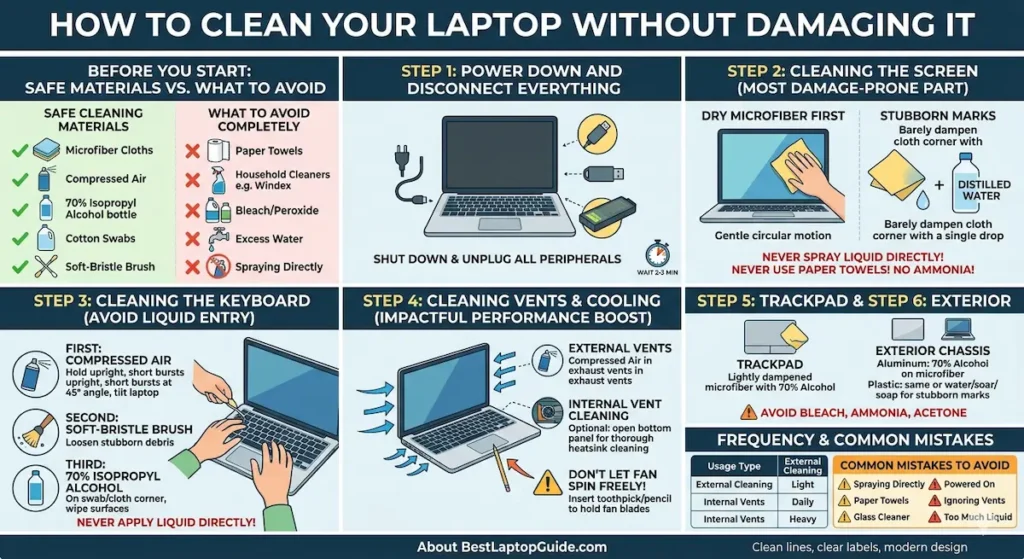
Safe cleaning materials:
- Microfiber cloths — lint-free, non-abrasive, essential for screen and chassis
- Compressed air (canned air) — the only safe tool for cleaning vents and keyboard gaps
- 70% isopropyl alcohol — safe for keyboard keys, trackpad, and chassis surfaces
- Distilled water — safe for diluting, safer than tap water which contains minerals
- Cotton swabs — for precision cleaning around keys and in corners
- Soft-bristle brush — for loosening debris from keyboard gaps before compressed air
What to avoid completely:
- Paper towels — abrasive enough to scratch screens and leave fine scratches on displays
- Regular household cleaners (Windex, multi-surface sprays) — contain ammonia, acetone, or alcohol concentrations that strip laptop screen coatings
- Undiluted bleach or hydrogen peroxide — too harsh for laptop surfaces and coatings
- Excess water — even a small amount that enters keyboard gaps or port openings can cause electrical damage
- Spraying anything directly onto the laptop — always apply liquid to the cloth first, never to the device
With the right materials assembled, how to clean your laptop without damaging it is genuinely straightforward — it just requires the right sequence and technique.
Step 1: Power Down and Disconnect Everything
This is non-negotiable for how to safely clean a laptop.
Shut the laptop down completely — not sleep mode, not hibernate. A powered machine with electricity running through components creates risk that a fully powered-off machine doesn’t. Unplug the charging cable, remove any USB devices or external peripherals, and if your laptop has an easily removable battery, remove it.
How to Make Your Laptop Last 5+ Years
Wait two to three minutes after shutdown before beginning. This lets residual heat dissipate and ensures no components are at operating temperature when you’re working around them.
For cleaning purposes, this step is primarily about safety — both for you and for the machine. Moisture near powered components is the primary cause of cleaning-related damage. Removing power eliminates that risk.
Step 2: How to Clean a Laptop Screen Without Damaging It
The screen is the most damage-prone part of how to clean your laptop without damaging it. Laptop displays have anti-glare or anti-reflective coatings that abrasive materials and harsh chemicals strip permanently — damage that can’t be undone.
What you need: One dry microfiber cloth. That’s often all that’s required.
The technique:
Start with a dry microfiber cloth and gentle circular motions. Most smudges, fingerprints, and surface dust come off cleanly with a dry microfiber without requiring any liquid at all. Use light, even pressure — you don’t need to press hard, and pressing hard creates the risk of pressure damage to the panel beneath.
13 Inch vs 15 Inch Laptop for College
For stubborn smudges that don’t respond to dry wiping, dampen a corner of the microfiber cloth with distilled water — not tap water, which contains minerals that leave residue. The cloth should be barely damp, not wet. A cloth that drips is too wet. Apply with the same gentle circular motion.
What absolutely not to do:
- Never spray water or any liquid directly onto the screen
- Never use paper towels, tissues, or rough cloths — even one pass can create micro-scratches that accumulate into visible haze
- Never use ammonia-based cleaners (most glass cleaners contain ammonia, which damages anti-reflective coatings)
If you’re cleaning a touchscreen display, the same technique applies. Touchscreens have oleophobic coatings that ammonia-based cleaners degrade — always distilled water or screen-specific cleaner on a microfiber only.
Buy Screen WipesStep 3: How to Clean a Laptop Keyboard Without Damaging It
The keyboard is where most cleaning damage happens — primarily from liquid getting beneath the keys. Understanding how to clean a laptop keyboard without damaging it means understanding that the goal is to remove debris and surface contamination without letting any liquid reach the electrical contacts underneath.
What you need: Compressed air, soft-bristle brush, microfiber cloth, 70% isopropyl alcohol, cotton swabs.
The technique — in order:
First, remove loose debris with compressed air. Hold the can upright and use short bursts directed at a 45-degree angle across the keyboard surface. Tilt the laptop at an angle while doing this — gravity helps dislodge debris downward and out rather than deeper into the chassis. Don’t hold the can upside down (this releases liquid propellant), and keep the nozzle at least an inch from the keyboard surface.
Second, use a soft-bristle brush to loosen stubborn debris in key gaps before a second compressed air pass. A clean, dry toothbrush works well for this.
Third, clean key surfaces with isopropyl alcohol. Dampen a cotton swab or a corner of a microfiber cloth with 70% isopropyl alcohol — not soaking, barely damp. Wipe across key surfaces to remove oils, grime, and bacterial buildup. The 70% concentration evaporates quickly and is safe for key surfaces without the moisture risk that higher-concentration solutions or water present.
The critical rule: Never apply liquid directly to the keyboard. Apply to the cloth or swab first, then to the key surface. If liquid enters the gaps between keys and reaches the membrane or motherboard beneath, you risk component damage that’s expensive to repair.
Step 4: How to Clean Laptop Vents Without Damaging It
This is the most impactful cleaning step for laptop performance — and the one most people never do. Dust in laptop vents is the primary cause of thermal throttling, fan noise, and shortened component lifespan. Knowing how to clean laptop vents without damaging the fan makes this safe and genuinely effective.
What you need: Compressed air.
The technique:
Direct short bursts of compressed air into the exhaust vents — the openings on the sides or rear of the laptop where hot air exits. Keep the can upright, use one to two second bursts rather than sustained blowing, and do this outdoors or in a well-ventilated area because the dust cloud that comes out can be significant on a machine that hasn’t been cleaned in a year or more.
The important caution about fans: Don’t let the fan spin freely from compressed air blasts without holding it in place. Fan bearings can be damaged by spinning faster than their rated speed from compressed air pressure. Insert a toothpick or pencil between fan blades through the vent opening to prevent free spinning while you clean, or use short controlled bursts that don’t generate sustained spin.
For a more thorough vent cleaning, opening the bottom panel (two to four screws on most modern laptops) gives direct access to the heatsink fins and fan. With the panel off, compressed air directed at the heatsink fins from both directions removes significantly more accumulated dust than external vent cleaning alone. If you’re not comfortable with this, a computer repair shop handles this service for $30–$60.
Step 5: How to Clean the Laptop Trackpad Without Damaging It
The trackpad is one of the simpler cleaning tasks in how to clean your laptop without damaging it — but the wrong approach damages the smooth surface that makes it work properly.
What you need: Microfiber cloth, small amount of 70% isopropyl alcohol.
The technique:
A lightly dampened microfiber cloth with 70% isopropyl alcohol handles trackpad cleaning well. Wipe with even, light pressure. The trackpad surface develops oil buildup from finger contact that pure dry wiping won’t fully remove — the alcohol cuts through this cleanly and evaporates without leaving residue.
Avoid any cleaning product that might leave a film or residue — this affects tracking sensitivity. And as always, apply the alcohol to the cloth rather than directly to the trackpad surface, keeping liquid from the edges where it could enter the chassis.
Step 6: How to Clean the Laptop Exterior Without Scratching It
The chassis — lid, bottom panel, palm rest areas — collects oils, grime, and marks that affect both appearance and feel. How to clean laptop exterior without scratching it depends primarily on your chassis material.
Aluminum and metal chassis: 70% isopropyl alcohol on a microfiber cloth handles this safely. Wipe with the grain if there’s a brushed texture. Avoid abrasive materials that scratch the anodized coating.
Plastic chassis: The same approach works, but plastic is slightly more susceptible to surface micro-scratches from abrasive cloths. Microfiber is essential here — nothing rougher.
For stubborn marks on plastic: A small amount of distilled water with a few drops of mild dish soap on a microfiber cloth can address marks that alcohol doesn’t remove. Immediately follow with a dry microfiber wipe to remove any soap residue.
What to avoid on all chassis materials: Any cleaner with bleach, ammonia, or acetone. These strip protective coatings and can permanently discolor plastic surfaces.
How Often Should You Clean Your Laptop?
How often to clean a laptop depends on how you use it and where.
| Usage Type | Recommended Cleaning Frequency |
|---|---|
| Light home use, rarely travels | External: monthly, Internal vents: every 12–18 months |
| Daily student or office carry | External: biweekly, Internal vents: every 6–12 months |
| Heavy use, gaming, dusty environment | External: weekly, Internal vents: every 3–6 months |
| Laptop used near food frequently | Keyboard: weekly |
The internal vent cleaning is the most commonly skipped and most impactful. Most laptop users have never cleaned their vents. A laptop that’s been accumulating dust for two to three years can see immediate, dramatic improvements in temperature, fan noise, and performance after a proper internal cleaning.
Common Mistakes to Avoid When Cleaning Your Laptop
Spraying liquid directly onto any surface. The number one cause of cleaning-related laptop damage. Always apply to the cloth or swab first.
Using paper towels on the screen. Paper towels are abrasive enough to leave micro-scratches across multiple passes. One use won’t visibly damage a screen; repeated use creates the hazy, scratched appearance that makes displays feel old.
Using household glass cleaner. Most contain ammonia, which strips anti-reflective and anti-glare screen coatings permanently. Once stripped, the coating doesn’t come back.
Cleaning with the laptop on. Even a small amount of liquid near powered components creates risk. Always power down and disconnect.
Ignoring the vents for years. The performance impact of dust accumulation in cooling fins is significant and immediate once cleaned. If your laptop runs hot and the fan is louder than it used to be, internal cleaning is almost certainly the fix.
Using too much liquid. More moisture is not more effective. The goal is barely damp, not wet. If you squeeze a cloth and liquid comes out, it’s too wet.
Frequently Asked Questions
How do I clean my laptop screen safely?
Use a dry microfiber cloth first — this handles most smudges. For stubborn marks, barely dampen the microfiber with distilled water. Never spray liquid directly on the screen and never use paper towels or household glass cleaners, which scratch or strip screen coatings.
Can I use rubbing alcohol to clean my laptop keyboard?
Yes — 70% isopropyl alcohol is safe for laptop keyboards. Apply to a microfiber cloth or cotton swab rather than directly to the keyboard. The 70% concentration evaporates quickly without leaving residue and is effective at removing oil buildup from keys.
How do I clean laptop vents without opening it?
Compressed air directed at exhaust vents in short bursts removes surface dust effectively without opening the chassis. Hold fan blades in place to prevent over-spinning. For thorough cleaning, opening the bottom panel provides significantly better access to the heatsink where most dust accumulates.
How often should I clean my laptop?
External cleaning monthly, internal vent cleaning every 6–12 months for daily users. If you notice fan noise has increased or the machine runs hotter than it used to, internal cleaning is overdue regardless of the schedule.
What household items can I use to clean my laptop?
A microfiber cloth, compressed air, and 70% isopropyl alcohol cover most laptop cleaning needs safely. Avoid paper towels, tissues, Windex, and any cleaner with ammonia, bleach, or acetone.
Final Thoughts
How to clean your laptop without damaging it is less complicated than the number of things that can go wrong suggests — as long as you use the right materials, apply liquids to cloths rather than directly to the device, and follow the sequence from screen to keyboard to vents to chassis.
The cleaning most people skip — internal vent cleaning — is the one that makes the biggest difference to how the machine performs and how long it lasts. A laptop that runs cooler and quieter after a proper cleaning session isn’t just cleaner. It’s genuinely healthier, and the components inside it will last longer as a result.
Clean your laptop consistently with the right approach, and it’s one of the most cost-effective maintenance habits you can build for a machine you depend on every day.
About BestLaptopGuide.com: Our editorial team provides hands-on laptop maintenance guidance based on real extended testing — not manufacturer claims. Updated regularly.
Disclosure: Some links on this page may be affiliate links. A small commission may be earned at no extra cost to you. This does not influence our content.